Posted by Natalie Sumbo on Aug 30, 2025
Tags: #self-hosting #nextcloud
How i transfered my data from google drive to Nextcloud & use it as Backup
A couple of weeks ago I made the decision to make my own home server from scratch. Why? Mainly for privacy and data leaks reasons (write something better). I wanted my data to be accessed by me and me only. Ultimately, I feel a lot better about running my home server in the long term. The Issue is most of my data is still on Google Drive. In this guide I will show you how I migrated my data from Goggle Drive to Nextcloud and how I use Nextcloud as a auto-backup storage for Good Notes.
Firstly, we need to understand what I even used google drive for. After my Microsoft license from school expired, I had to use google docs, presentation and sheet instead of the Microsoft Apps to do any work. So those files were automatically saved in the Drive. Another way i used Google Drive was to upload my backups or when i just wanted to transfer a files.
Overview
Here's a summary of what to expect:
- Setting up Google OAuth Credentials
- Set up OAUth in Nextcloud
- Migrating data from Google Drive to Nextcloud
- Configure background jobs in Nextcloud
- How to Set Up GoodNotes with Nextcloud WebDAV
Migrate data from Google Drive
1. Create Google OAuth Credentials
First, you'll need to create OAuth credentials in the Google Cloud Console:
- Go to the Google Cloud Console
- Create a new project or select an existing one
- Enable the Google Drive API:
- Go to "APIs & Services" > "Library"
- Search for "Google Drive API" & "Google Calendar API" and enable it
- Create OAuth 2.0 credentials:
- Go to "APIs & Services" > "Credentials"
- Click "Create Credentials" > "OAuth 2.0 Client IDs"
- Choose "Web application" as the application type
- Add your Nextcloud domain to "Authorized redirect URIs":
- Format:
https://your-nextcloud-domain.com/apps/sociallogin/custom_oauth2/Google - Replace with your actual Nextcloud URL
- Format:
2. Configure Nextcloud
As the administrator:
- Go to your Nextcloud admin panel
- Navigate to "Settings" > "Administration" > "Connected accounts"
- Find the Google section
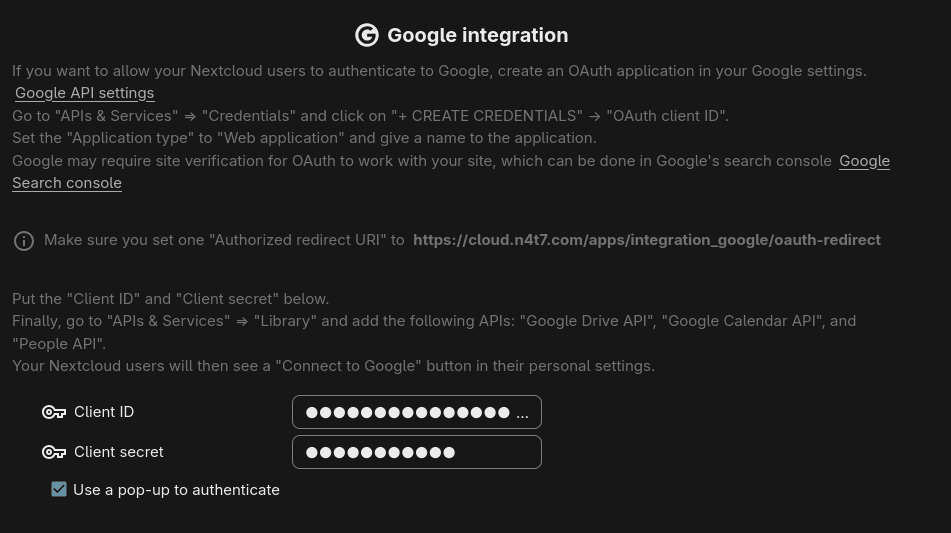
- Enter the OAuth credentials you created:
- Client ID: From your Google Cloud Console
- Client Secret: From your Google Cloud Console
- Save the configuration
3. Test the Migration
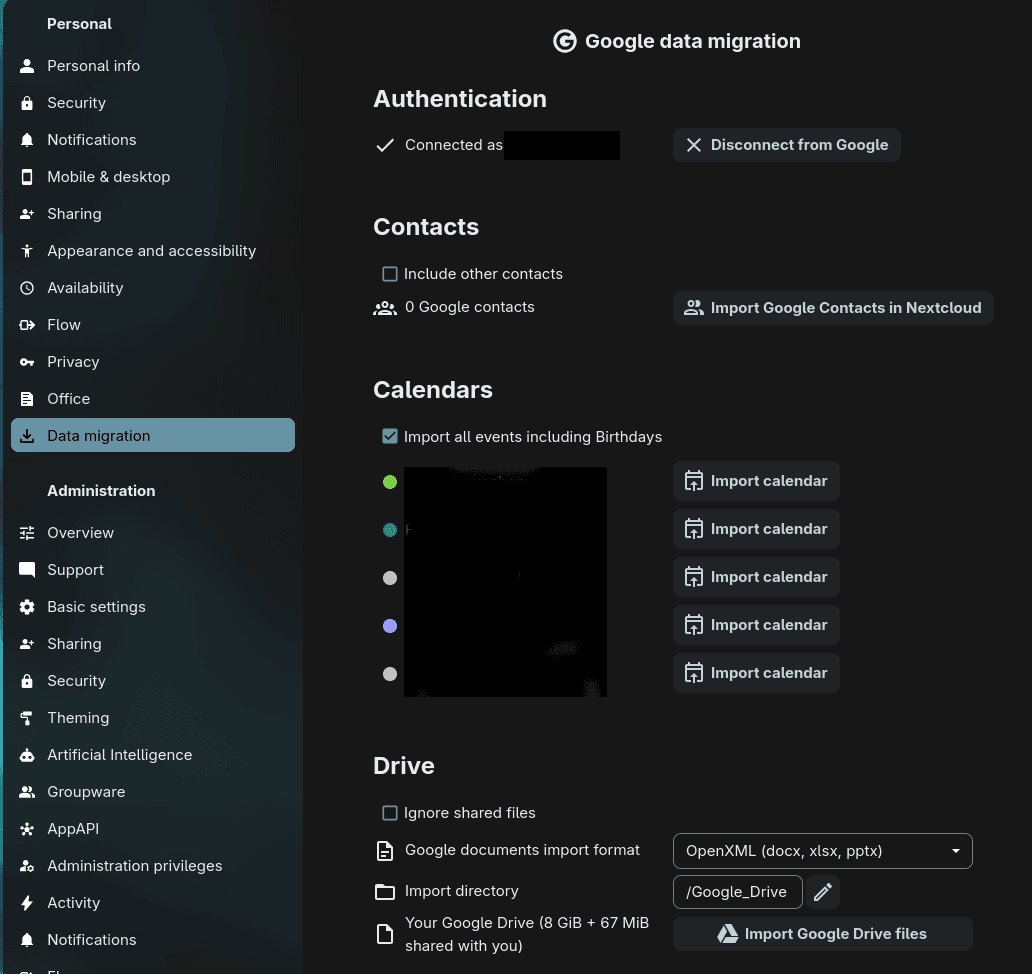
Now if you go under "Personal Settings" > "Data migration" you should be able to login to your Google Account. After you've done that successfully depending on what you selected during the login you will see the sections "Contacts", "Calendars", "Drive". There you will find a button "Import google drive files" click on that. Then will see that it will start with the migration.
Background jobs
Sadly that was not the case for me. It was stuck at 0% for several hours:
Your Google Drive (8 GiB + 67 MiB shared with you)
 0 files imported (0%) Google Drive background import process will begin soon. You can close this page. You will be notified when it finishes.
For me the issue was that the background jobs where not configured correctly. In the Nextcloud documentation they recommend using Cron for doing regular tasks: Background Jobs Configuration.
To fix that follow these steps:
- Go to Settings > Administration > Basic settings
- In "Background jobs" make sure "Cron" is set
- In your Nextcloud container
sudo docker exec -it <container-name> bash

cd /var/www/html

su -s /bin/bash www-data -c "php /var/www/html/cron.php"

exit
On your host system run
crontab -e

#Add this line to the file
*/5 * * * * docker exec -u www-data nextcloud php /var/www/html/cron.php
Test Job
You can test this from your host system
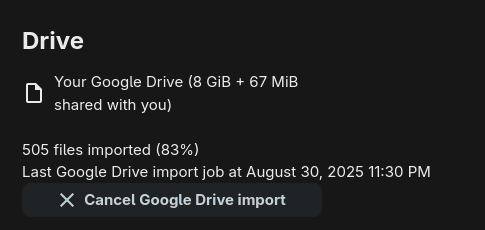
docker exec -u www-data nextcloud php /var/www/html/cron.phpNow the migration should look like this.
Good Notes Auto-Backup
Good Notes is one of the best tools to write handwritten notes on you IPad. I usually use it to write my notes during lectures, which will then be used during exam season. Since Good Notes has a feature to make an automatic backup to the cloud storage of your choosing, I thought we could also move from Google Drive to NextCloud. For that we are going to chose the option WebDAV. [Add picture here in good notes]
Let me explain how this works:
What is WebDAV?
WebDAV (Web Distributed Authoring and Versioning) is a protocol that allows you to access and manage files on a remote server as if they were local files. Nextcloud has built-in WebDAV support, which means apps like GoodNotes can connect directly to your Nextcloud storage.
How to Set Up GoodNotes with Nextcloud WebDAV
1. Get Your Nextcloud WebDAV URL
Your Nextcloud WebDAV URL follows this format:
https://your-nextcloud-domain.com/remote.php/dav/files/YOUR_USERNAME/2. Create App Password in Nextcloud
For security, create a dedicated app password:
- Log into your Nextcloud web interface
- Go to Settings > Personal > Security
- Scroll down to "App passwords"
- Enter a name like "GoodNotes" and click "Create new app password"
- Save the generated password - you'll need it for GoodNotes
3. Configure GoodNotes WebDAV
In GoodNotes:
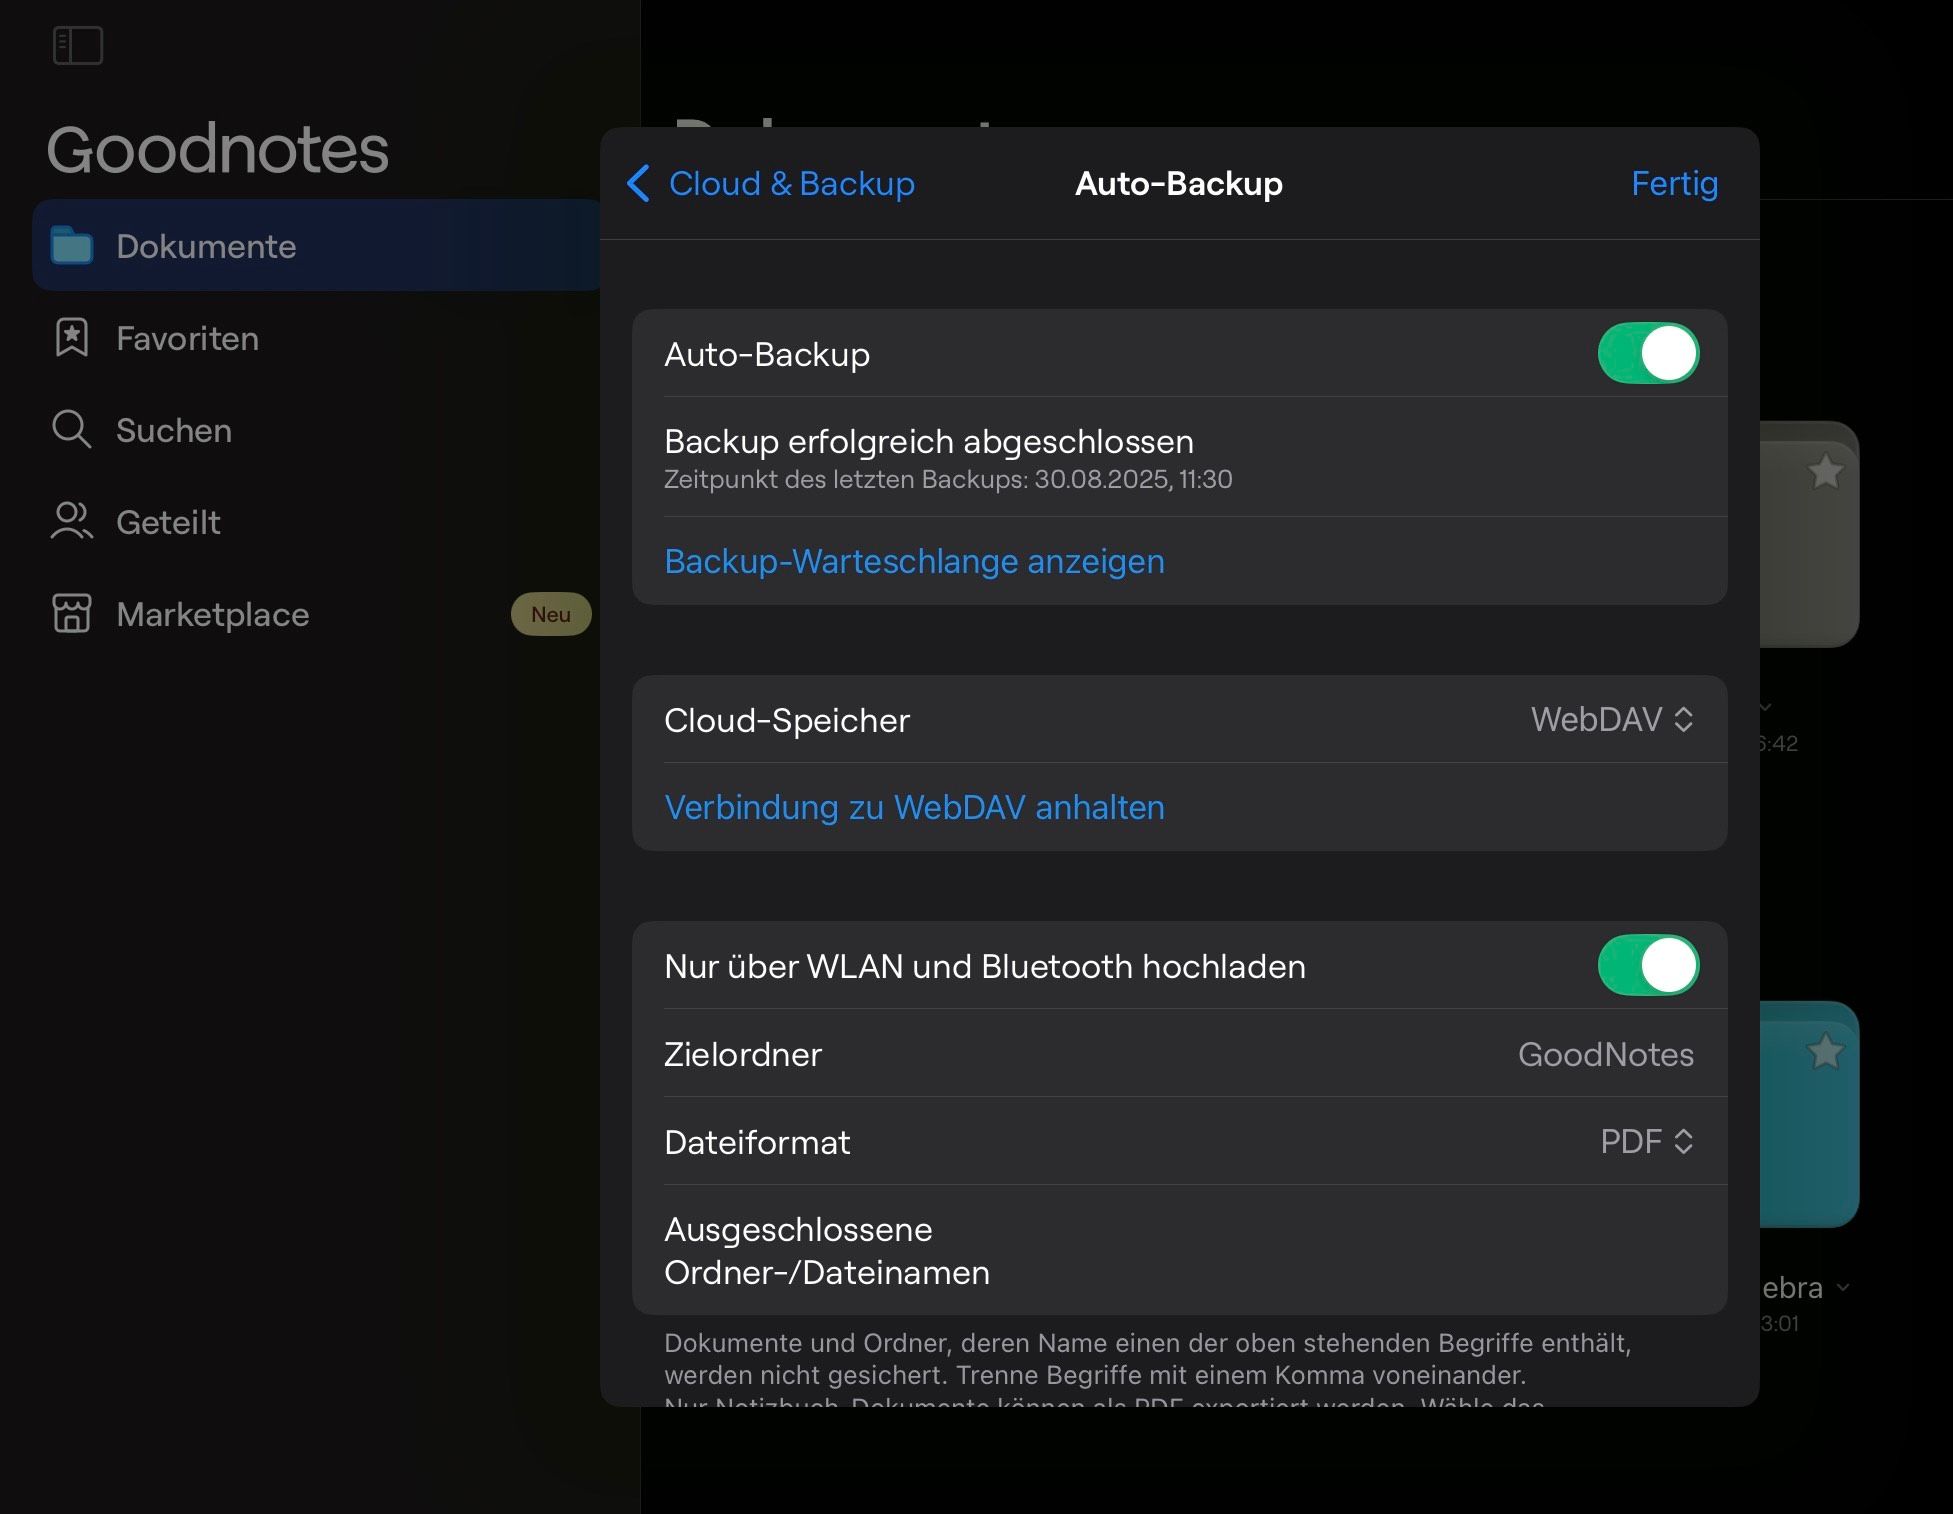
- Open Settings > Backup & Sync
- Choose WebDAV as your backup method
- Enter your connection details:
- Server URL:
https://cloud.n4t7.com/remote.php/dav/files/YOUR_USERNAME/ - Username: Your Nextcloud username
- Password: The app password you just created (or your regular password)
- Server URL:
- Test the connection
- Choose which folders to sync/backup
4. What Gets Synced
GoodNotes will create a folder structure in your Nextcloud, typically:
- Your notebooks as PDF files
- Any exported documents
- Backup files of your notes
Conclusion
Welcome to the end of this guide! Whether or not you followed every section of this guide, at this point you'll have setup capable of storing your backup. Since Nextcloud has built-in WebDAV support you can setup any tool that supports WebDAV as a remote service. I for example use Obsidian to store all my notes. To sync notes between local and cloud with smart conflict I use the "Remotly Save" Plugin. There is also an option to pick WebDAV. As you can see Nextcloud is the perfect tool to store your data. Stay safe out there!